

- Introduction
- Quick Takeaways
- What Makes an MP4 File So Large?
- Method 1: Compress MP4 to a Target File Size
- Method 2: Use Advanced Compression for More Control
- Method 3: Trim Unnecessary Footage First
- Method 4: Crop Black Bars or Unused Areas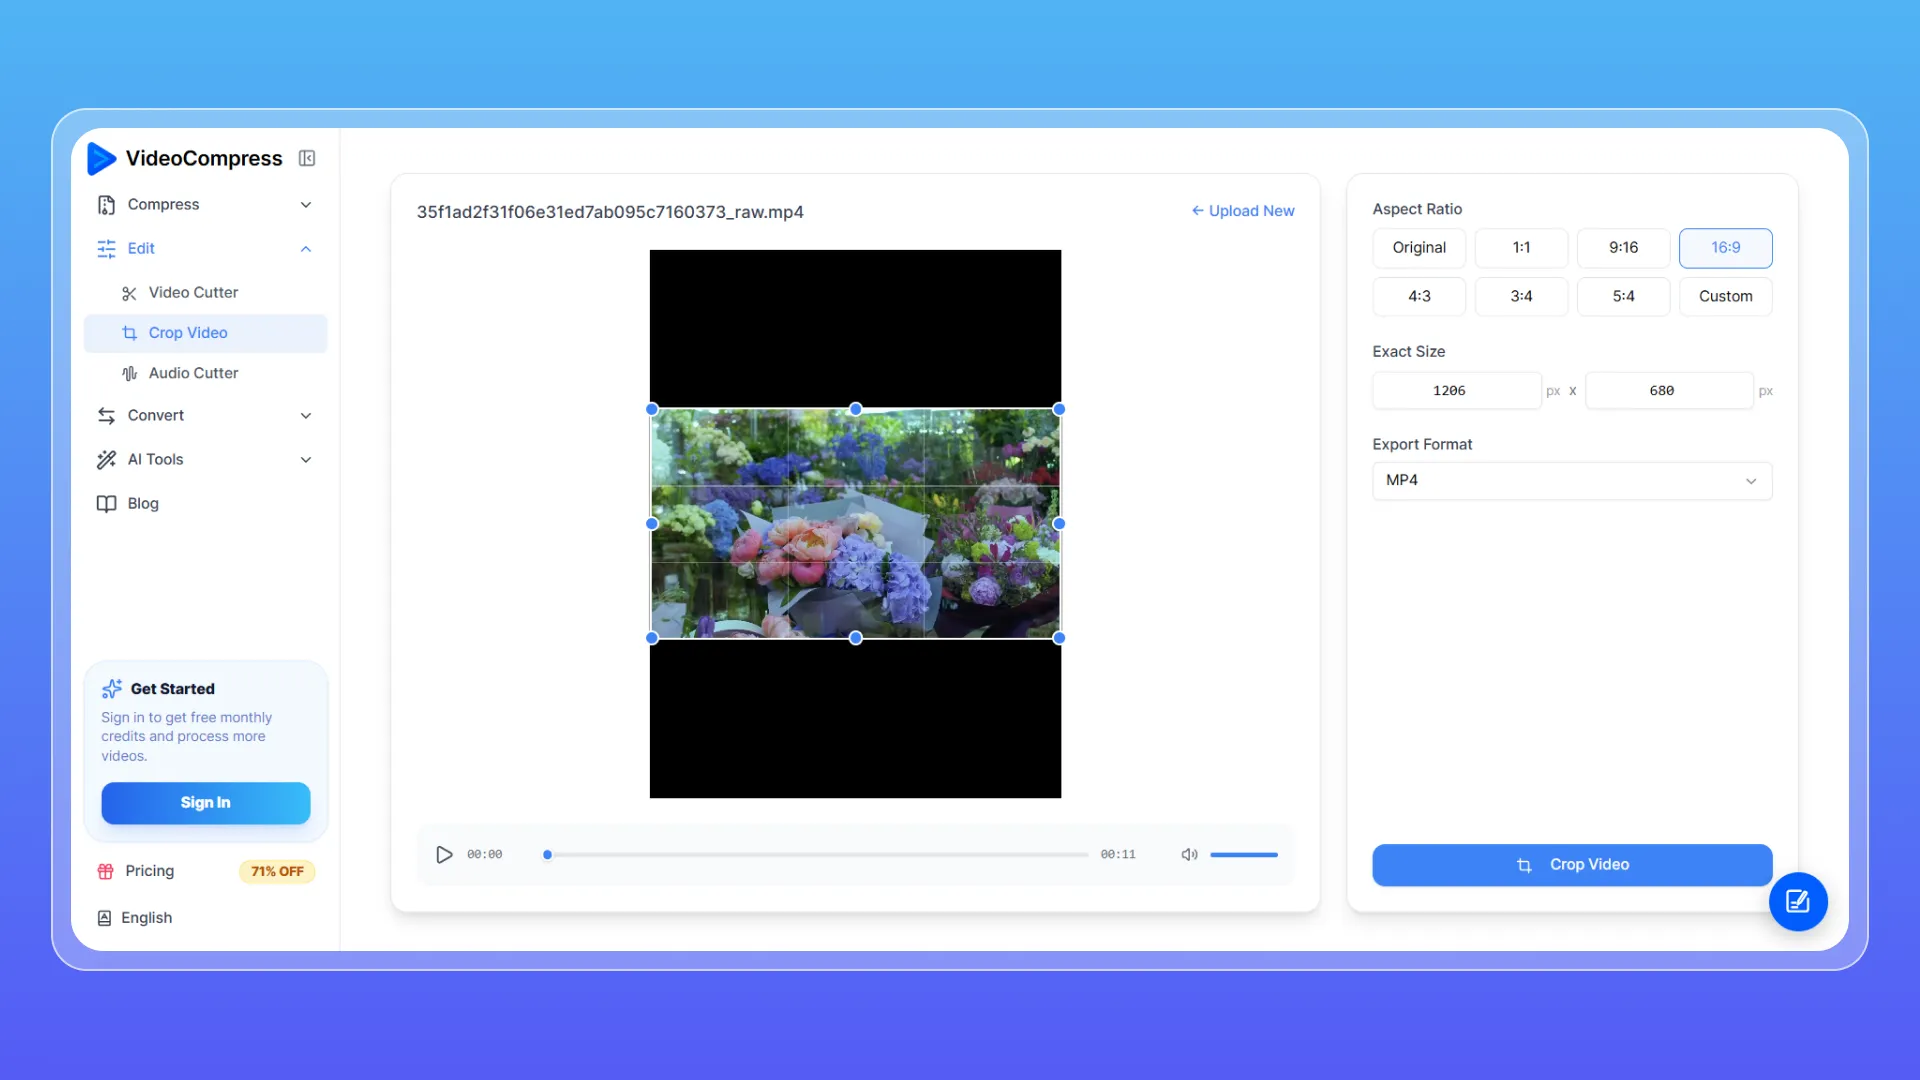
- How to Reduce MP4 File Size on iPhone or Android
- Which Method Should You Choose?
- Tips to Reduce MP4 Size Without Obvious Quality Loss
- FAQ
- Final Thoughts
How to Reduce MP4 File Size Without Losing Quality in 2026
Introduction
Large MP4 files are fine until you need to upload, email, store, or share them. A crisp phone video can suddenly become a 300 MB problem, and personal Gmail accounts still cap attachments at 25 MB.
The simplest fix is an online video compressor. Instead of working through complex encoding settings, you can choose a target file size or adjust compression based on the quality you want. You can also trim unwanted footage or crop unused areas before compressing.
Below, we’ll show you how to reduce MP4 file size with VideoCompress, then explain what resolution, bitrate, frame rate, codec, CRF, trimming, and cropping actually change.
Quick Takeaways
- Need a file under a specific MB limit? Use a video compressor with a target file size.
- Care more about video quality than an exact file size? Use Advanced Compression.
- Have dead space or unwanted scenes? Cut them before compression.
- Have black bars or unused edges? Crop them first.
- On iPhone or Android? A browser-based MP4 compressor can reduce video size without another app.
What Makes an MP4 File So Large?
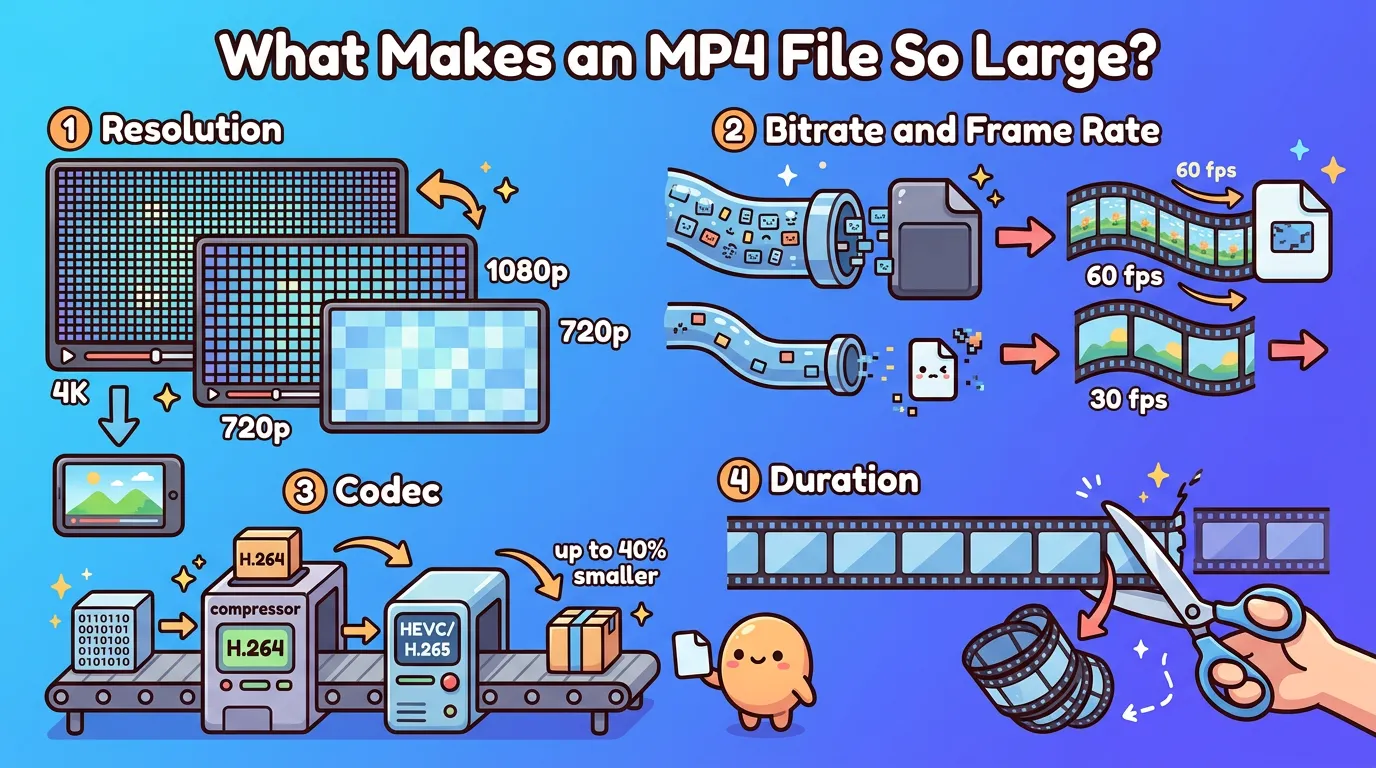
Resolution
Resolution is the number of pixels in each frame. A 4K frame carries far more image data than 1080p, and 1080p carries more than 720p. Apple notes that higher resolutions and faster frame rates create larger video files.
If your 4K clip will be viewed on a phone, website, email, or presentation, keeping every original pixel may not be necessary.Lowering 4K to 1080p—or 1080p to 720p—can reduce video size while still looking good at the final viewing size.
Bitrate and Frame Rate
Bitrate is roughly the amount of video data used per second. Higher bitrate can preserve more detail, but it also means a larger file. Push it too low and you may see blockiness, banding, or artifacts in motion.
Frame rate matters too. A 60 fps clip contains twice as many frames per second as a 30 fps clip. But do not lower it automatically: YouTube currently recommends uploading at the same frame rate as the source. Its SDR guidance also lists 8 Mbps for standard-frame-rate 1080p and 12 Mbps for high-frame-rate 1080p, showing how resolution, frame rate, and bitrate work together.
Codec and Duration
MP4 is a container, not a codec. The video inside may use H.264, H.265/HEVC, or another standard. Apple says HEVC can produce files up to 40% smaller than H.264 while preserving the same visual quality in its Compressor workflow.
Duration is simpler: remove minutes of footage and you remove data. That is why cutting can be just as useful as changing technical settings.
Method 1: Compress MP4 to a Target File Size
If your actual problem is “this file is 180 MB and I need it under 50 MB,” start with VideoCompress Basic Compression.
This is the easiest video compressor workflow because you choose the outcome rather than reverse-engineering bitrate, codec, and quality settings.
How to Use Basic Compression
- Open VideoCompress and upload your MP4.
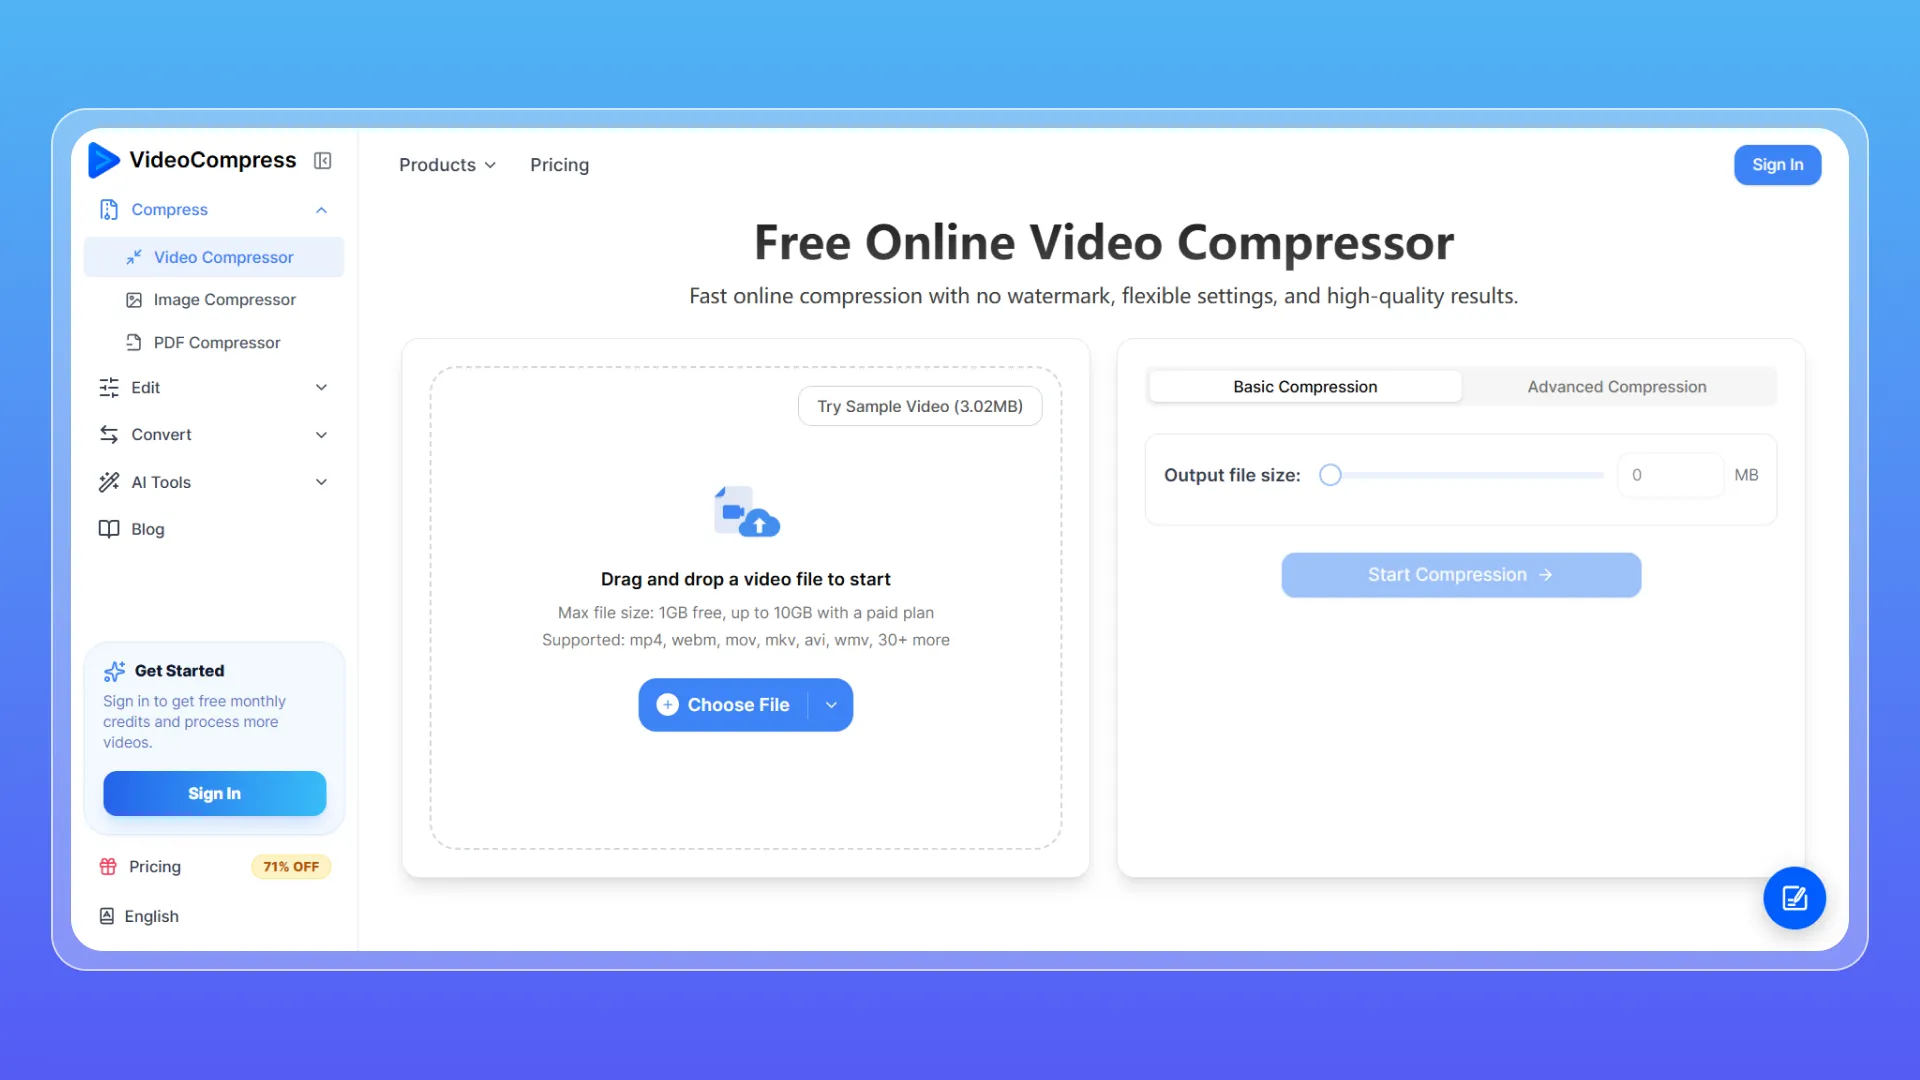
- Keep Basic Compression selected.
- Set the Output file size you want.
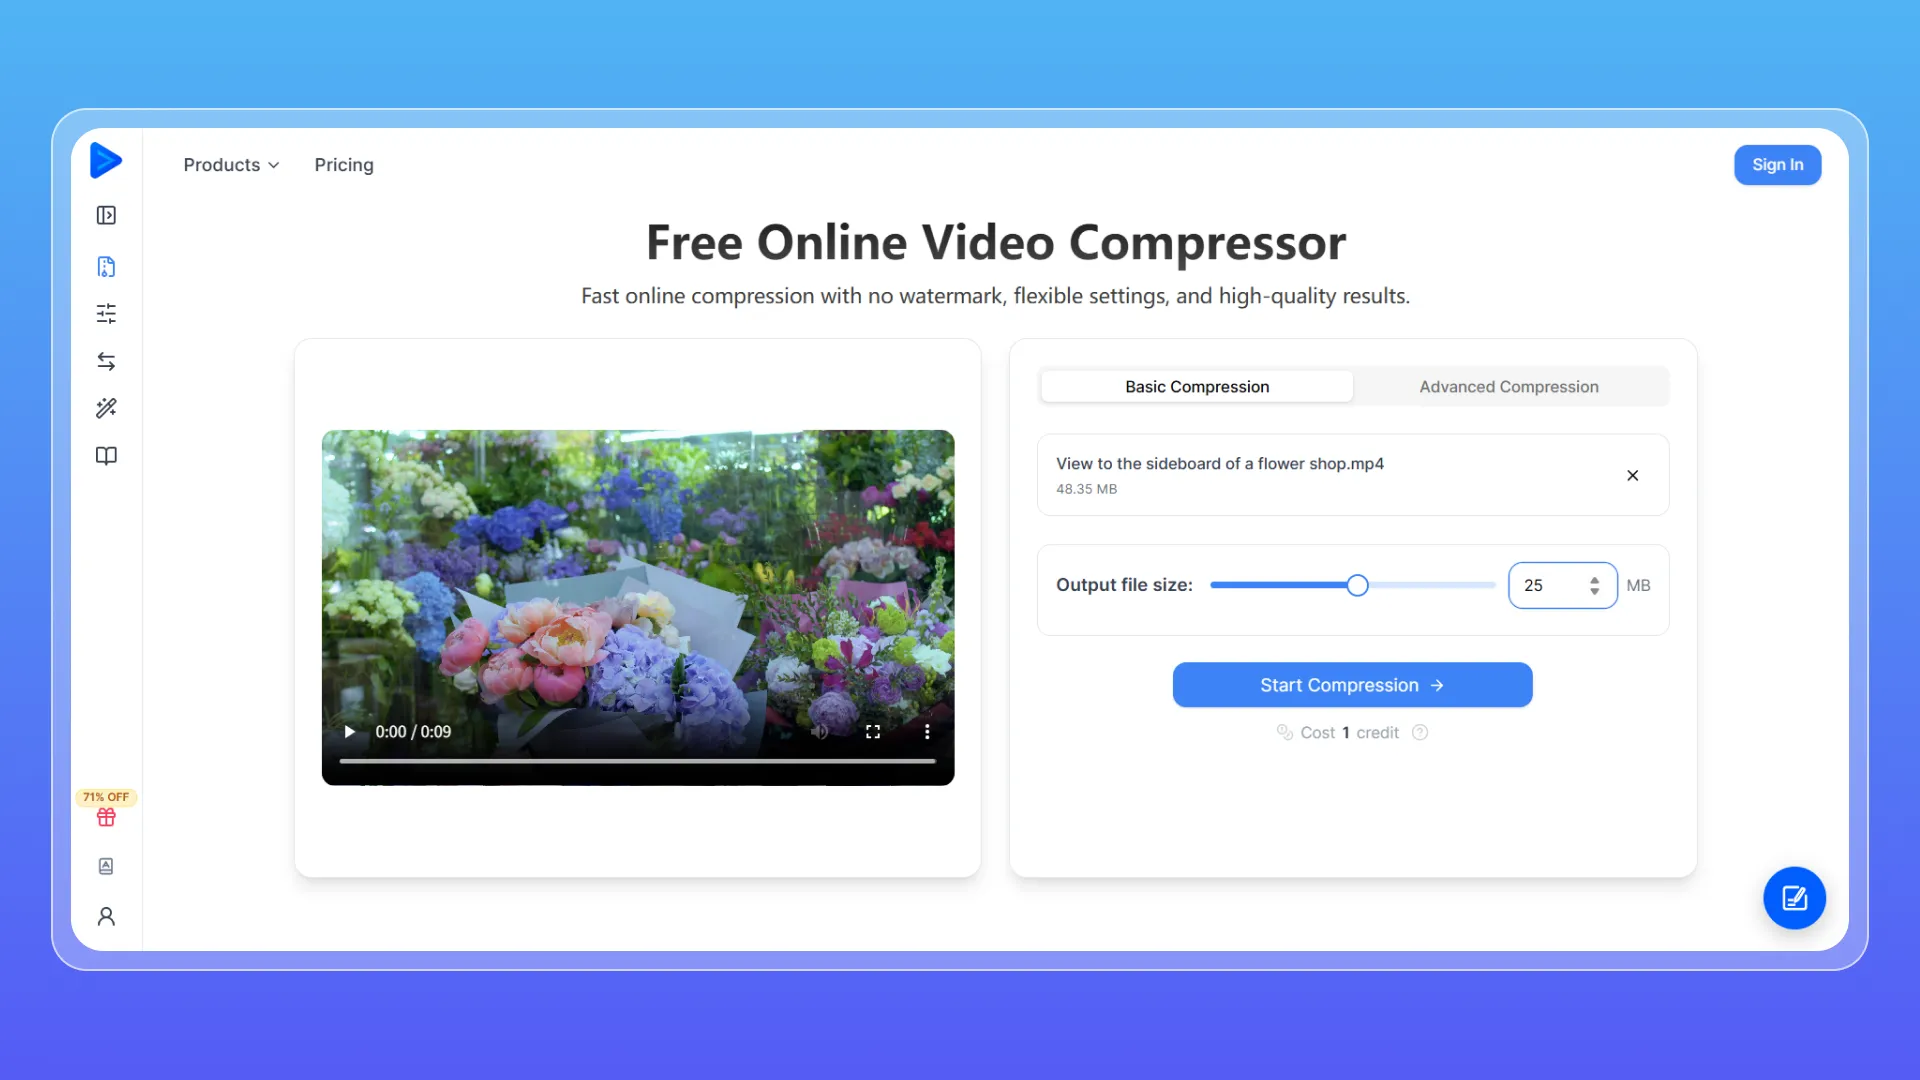
- Click Start Compression.
- Download the smaller MP4.
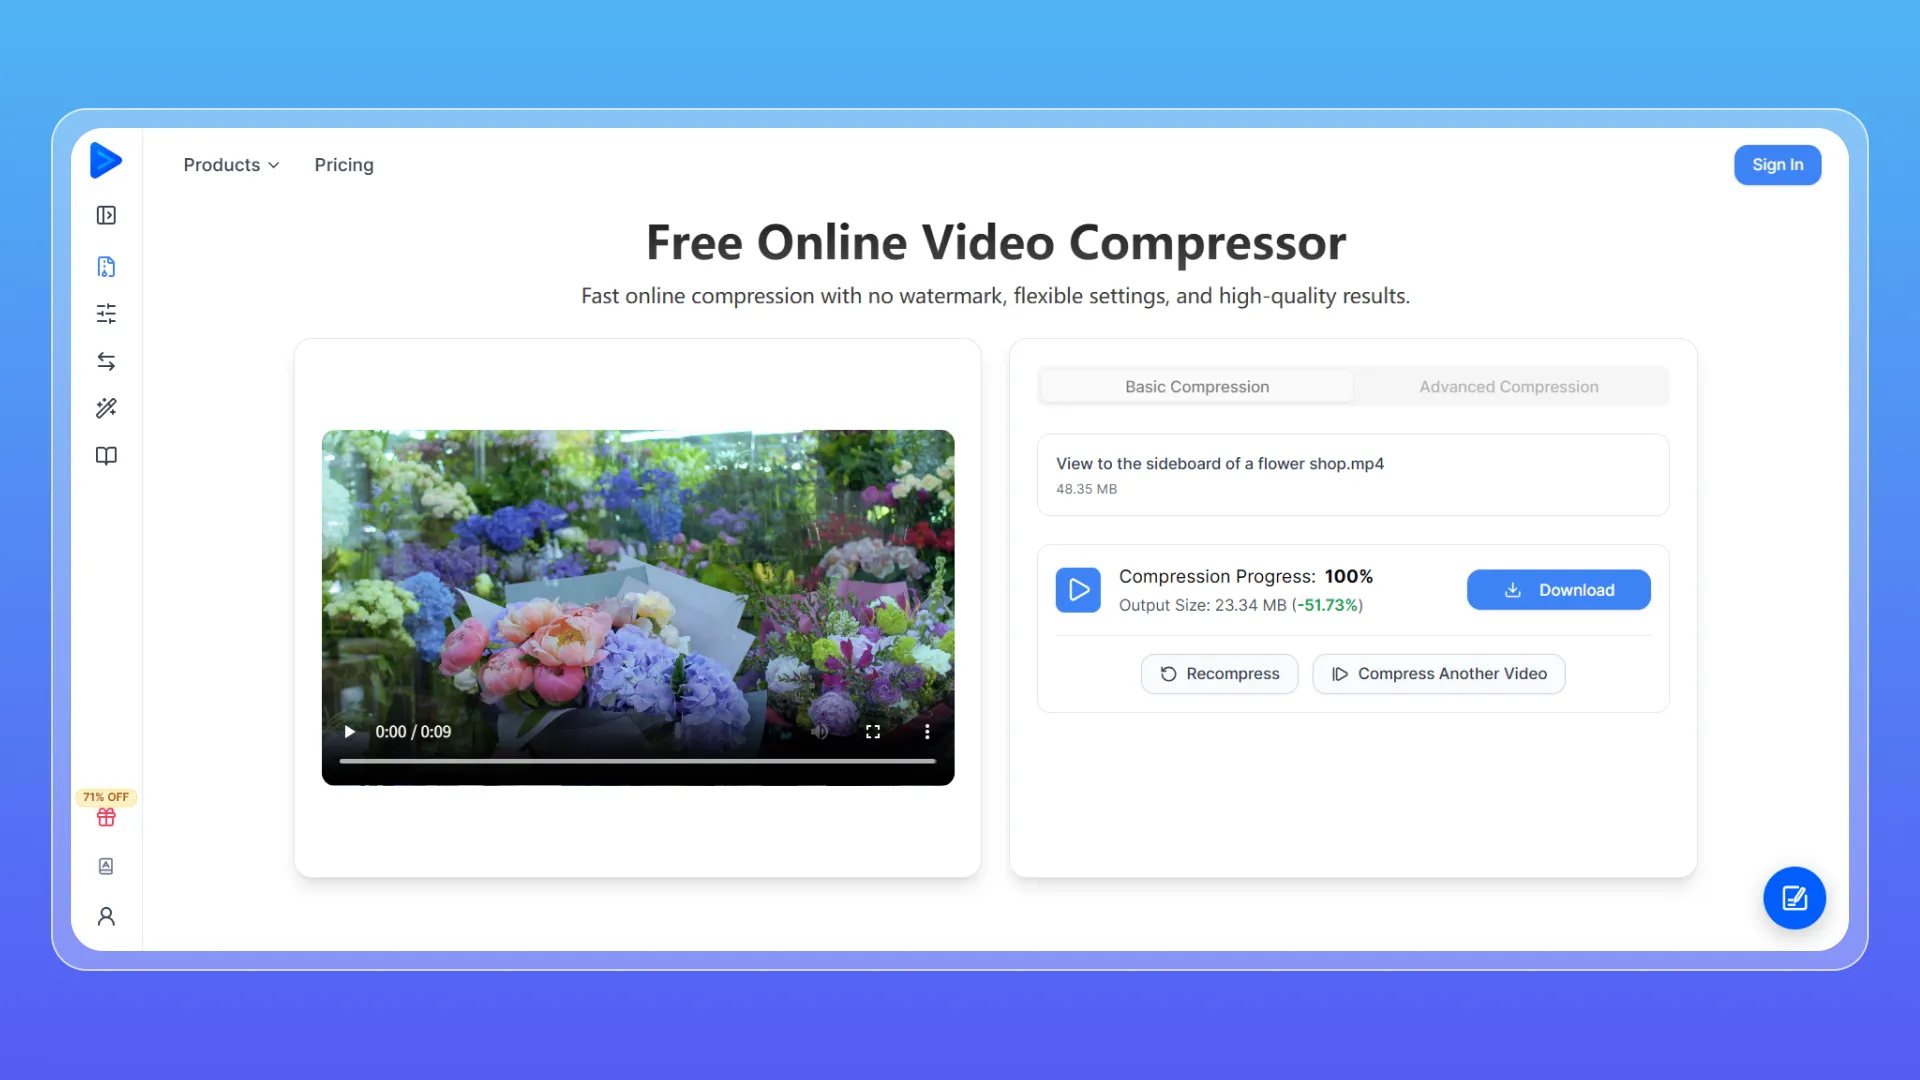
A target-size MP4 compressor is especially useful when there is a hard ceiling. If a form accepts files up to 100 MB, aim below that limit. If you need to send a clip as an email attachment, choose a target that fits the service you use.
VideoCompress runs online, requires no software installation, and does not add a watermark. If you just need a smaller file quickly, Basic Compression is the most direct option.
A quick note on quality: making a video significantly smaller usually involves some data loss. The goal is to reduce file size while keeping any visible difference minimal during normal viewing.
Method 2: Use Advanced Compression for More Control
Sometimes file size is only half the goal. Maybe subtitles must stay sharp, or you are working with 4K footage. That is when the video compressor’s Advanced Compression mode becomes useful.
Choose H.264 or H.265
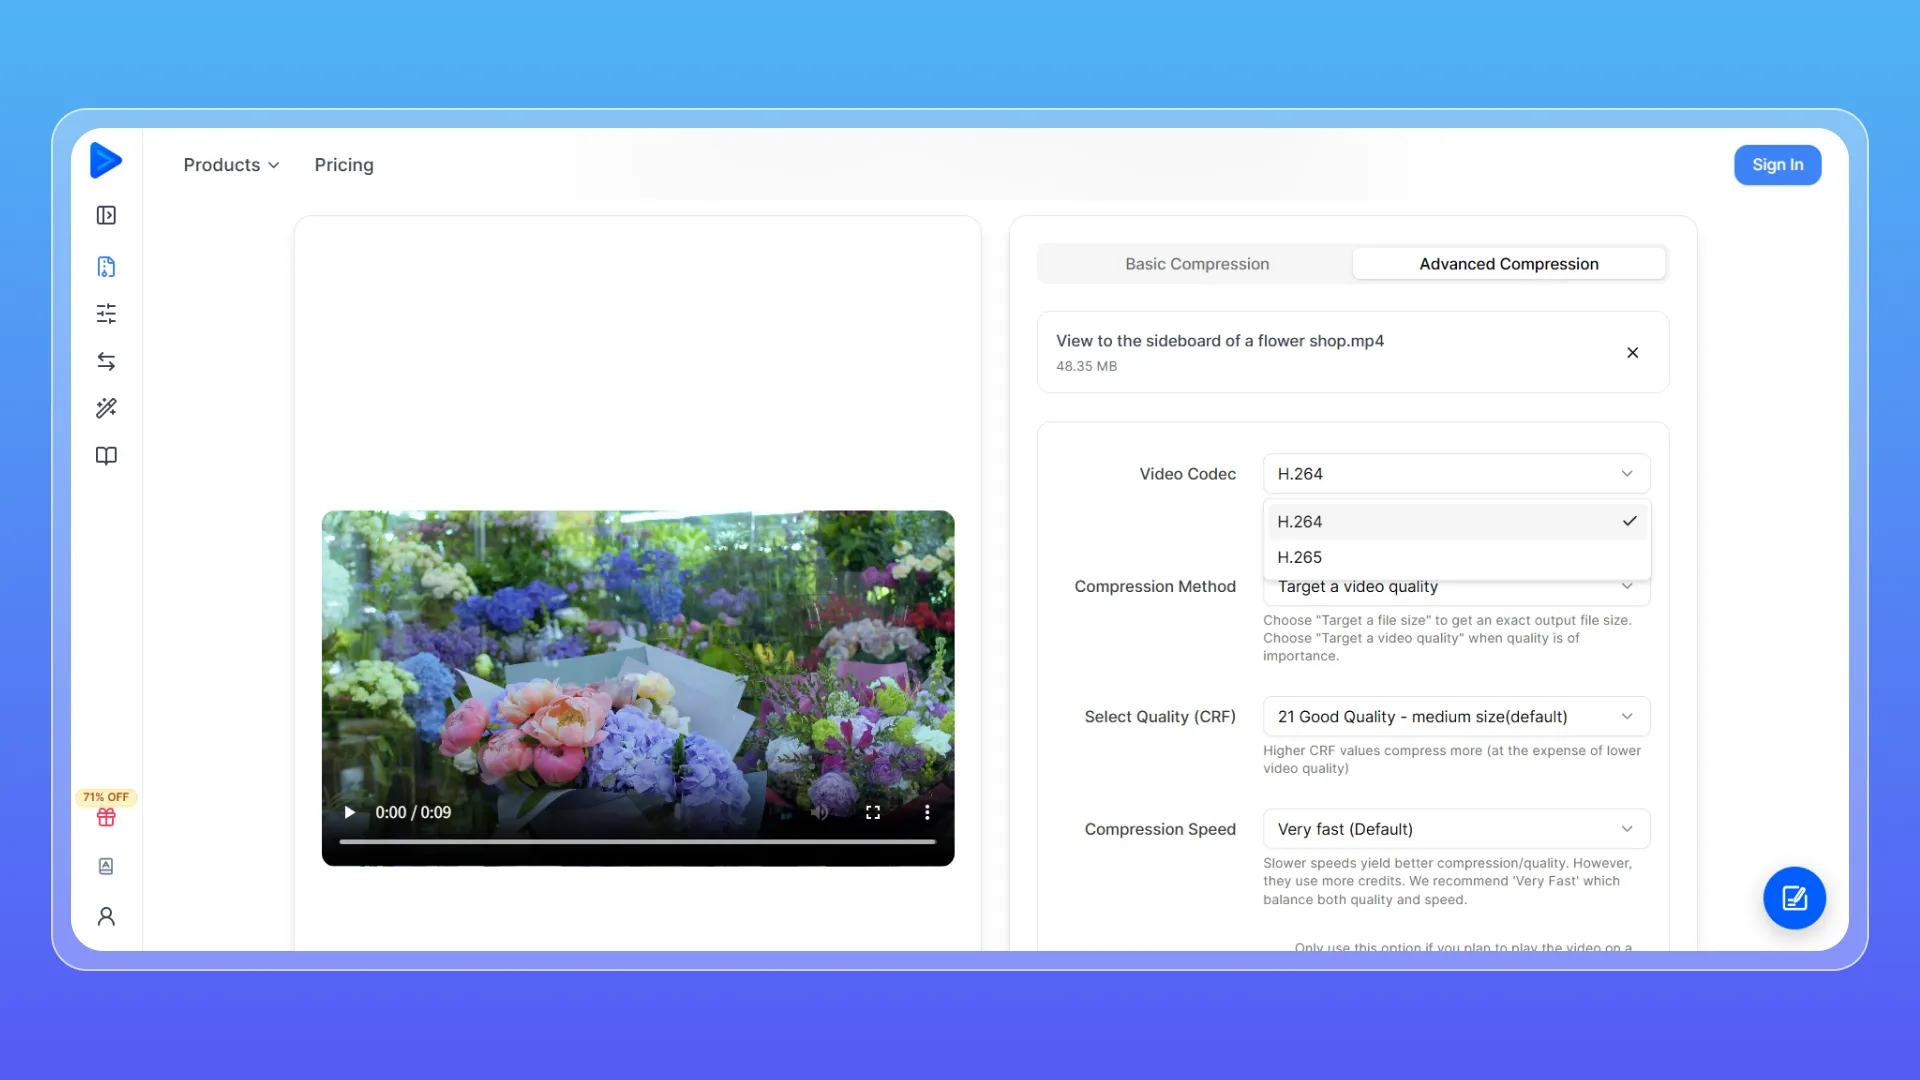
The Video Codec setting controls how the video is encoded.
H.264 is a strong default when compatibility is your priority.
H.265/HEVC is useful when compression efficiency matters more. Apple’s guidance says HEVC can create files up to 40% smaller than H.264 at the same visual quality in its Compressor workflow.
A simple rule:
- Choose H.264 for broad compatibility.
- Try H.265 when you want a smaller file and your playback environment supports it.
Choose the Right Compression Method
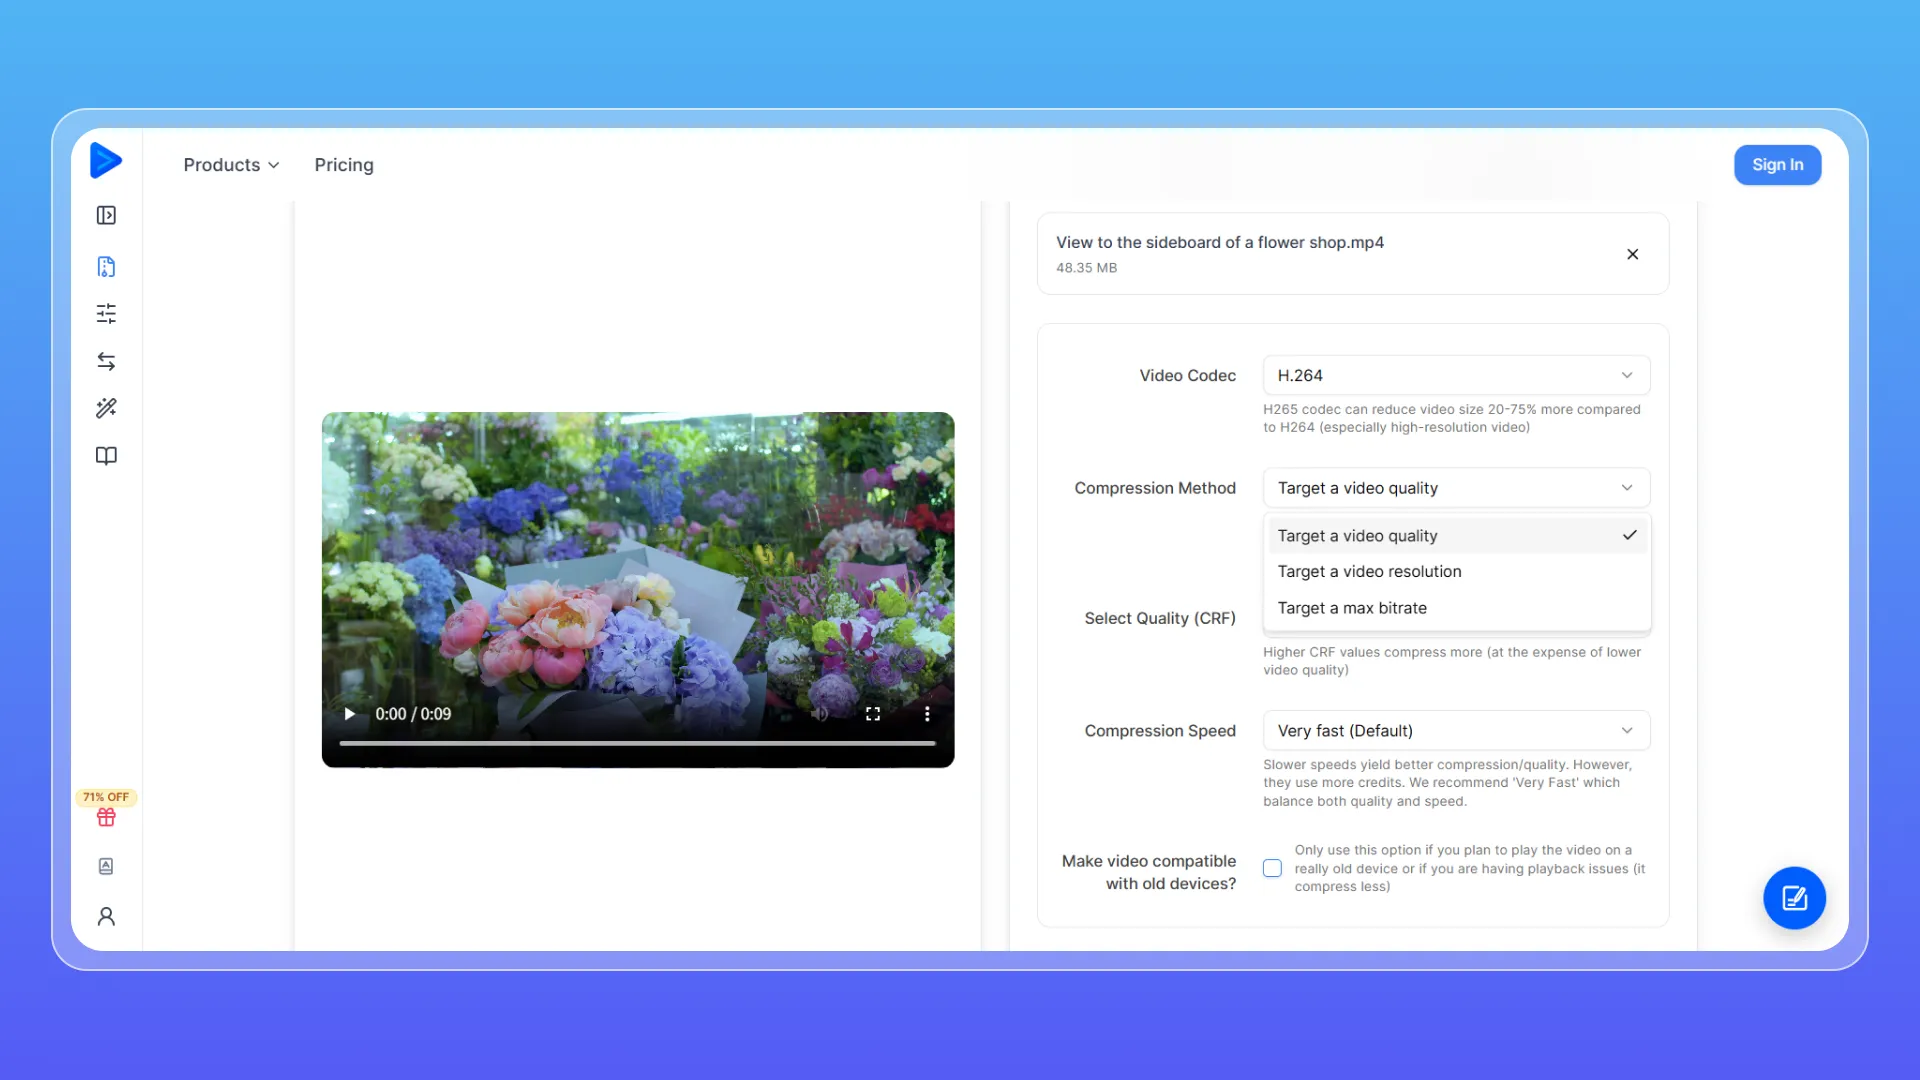
Advanced Compression lets you target video quality, resolution, or a maximum bitrate.
- Target video quality when keeping the video looking clear matters most.
- Target video resolution when the original resolution is higher than you need.
- Target max bitrate when you want more control over how much data the video uses.
If you simply need an MP4 under a specific file-size limit, Basic Compression is the easier choice.
Adjust Quality With CRF
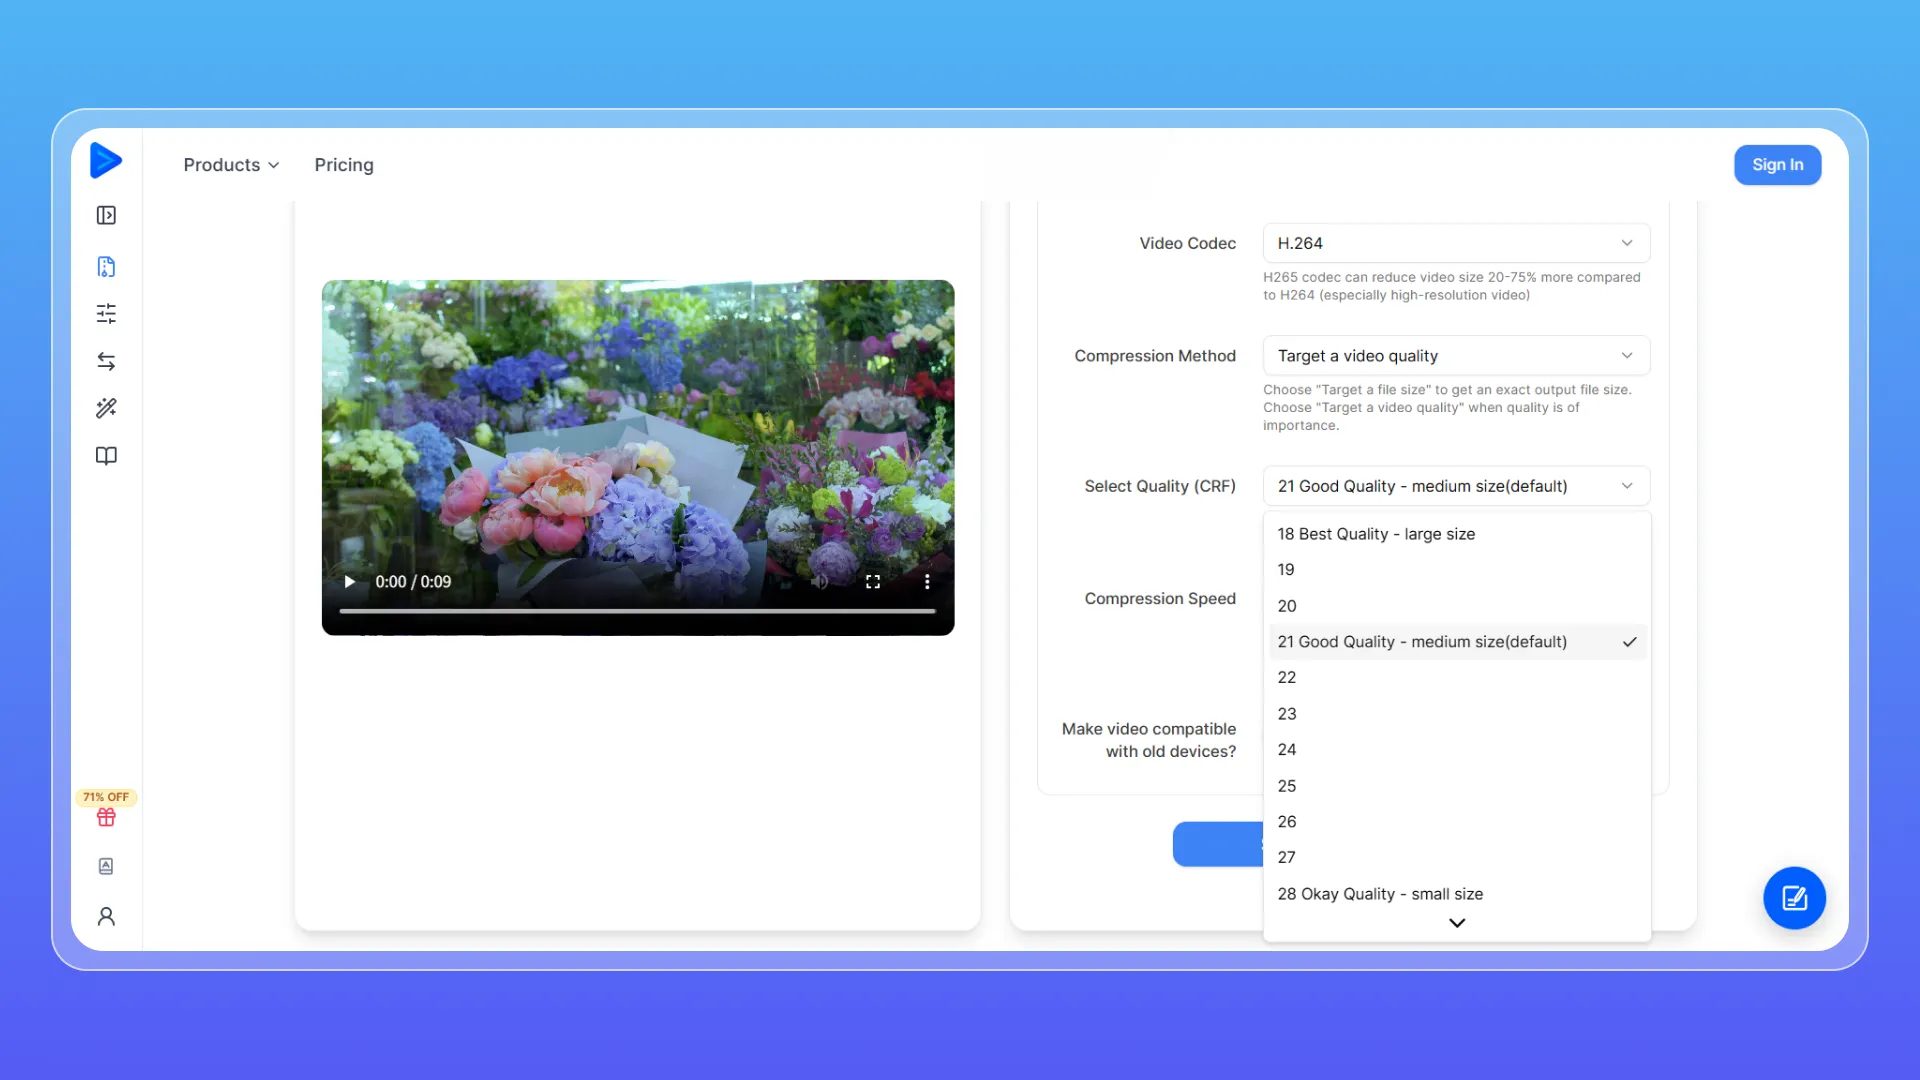
In quality-based compression, you may see CRF, or Constant Rate Factor.
The practical version is simple:
- Lower CRF generally means higher quality and a larger file.
- Higher CRF generally means stronger compression and a smaller file.
Start with the default. If you need a smaller result, increase compression gradually and inspect text, faces, gradients, hair, and fast movement. These areas often reveal over-compression first.
CRF helps balance video quality and file size without setting a fixed bitrate.
Lower Resolution When You Do Not Need Every Pixel
Changing resolution is one of the most practical ways to shrink an MP4.
If the source is 4K but the final clip will be viewed mainly on phones or embedded in a small page, 1080p may be enough. For a lightweight tutorial, email clip, or support recording, 720p can also work well.
YouTube’s recommended upload bitrates drop as resolution drops, reflecting the lower data demand of smaller frames. For example, its current SDR guidance recommends 8 Mbps for standard-frame-rate 1080p, 5 Mbps for 720p, and 2.5 Mbps for 480p.
With Target a video resolution, you can match the output to where the video will actually be viewed. For example, a 4K source may not be necessary for an email, web player, presentation, or phone screen.
Avoid increasing the resolution above the original, since upscaling does not restore missing detail.
What About Bitrate and Frame Rate?
Both affect size, but neither has one magic setting.
Target size, CRF, codec, and resolution all influence the bitrate the encoder ultimately uses. Frame rate can also change size: going from 60 fps to 30 fps means fewer frames to encode, but sports, games, and action footage may look less smooth.
Use the video compressor to control the final balance rather than treating one bitrate or frame-rate number as a universal answer.
Compression Speed and Compatibility
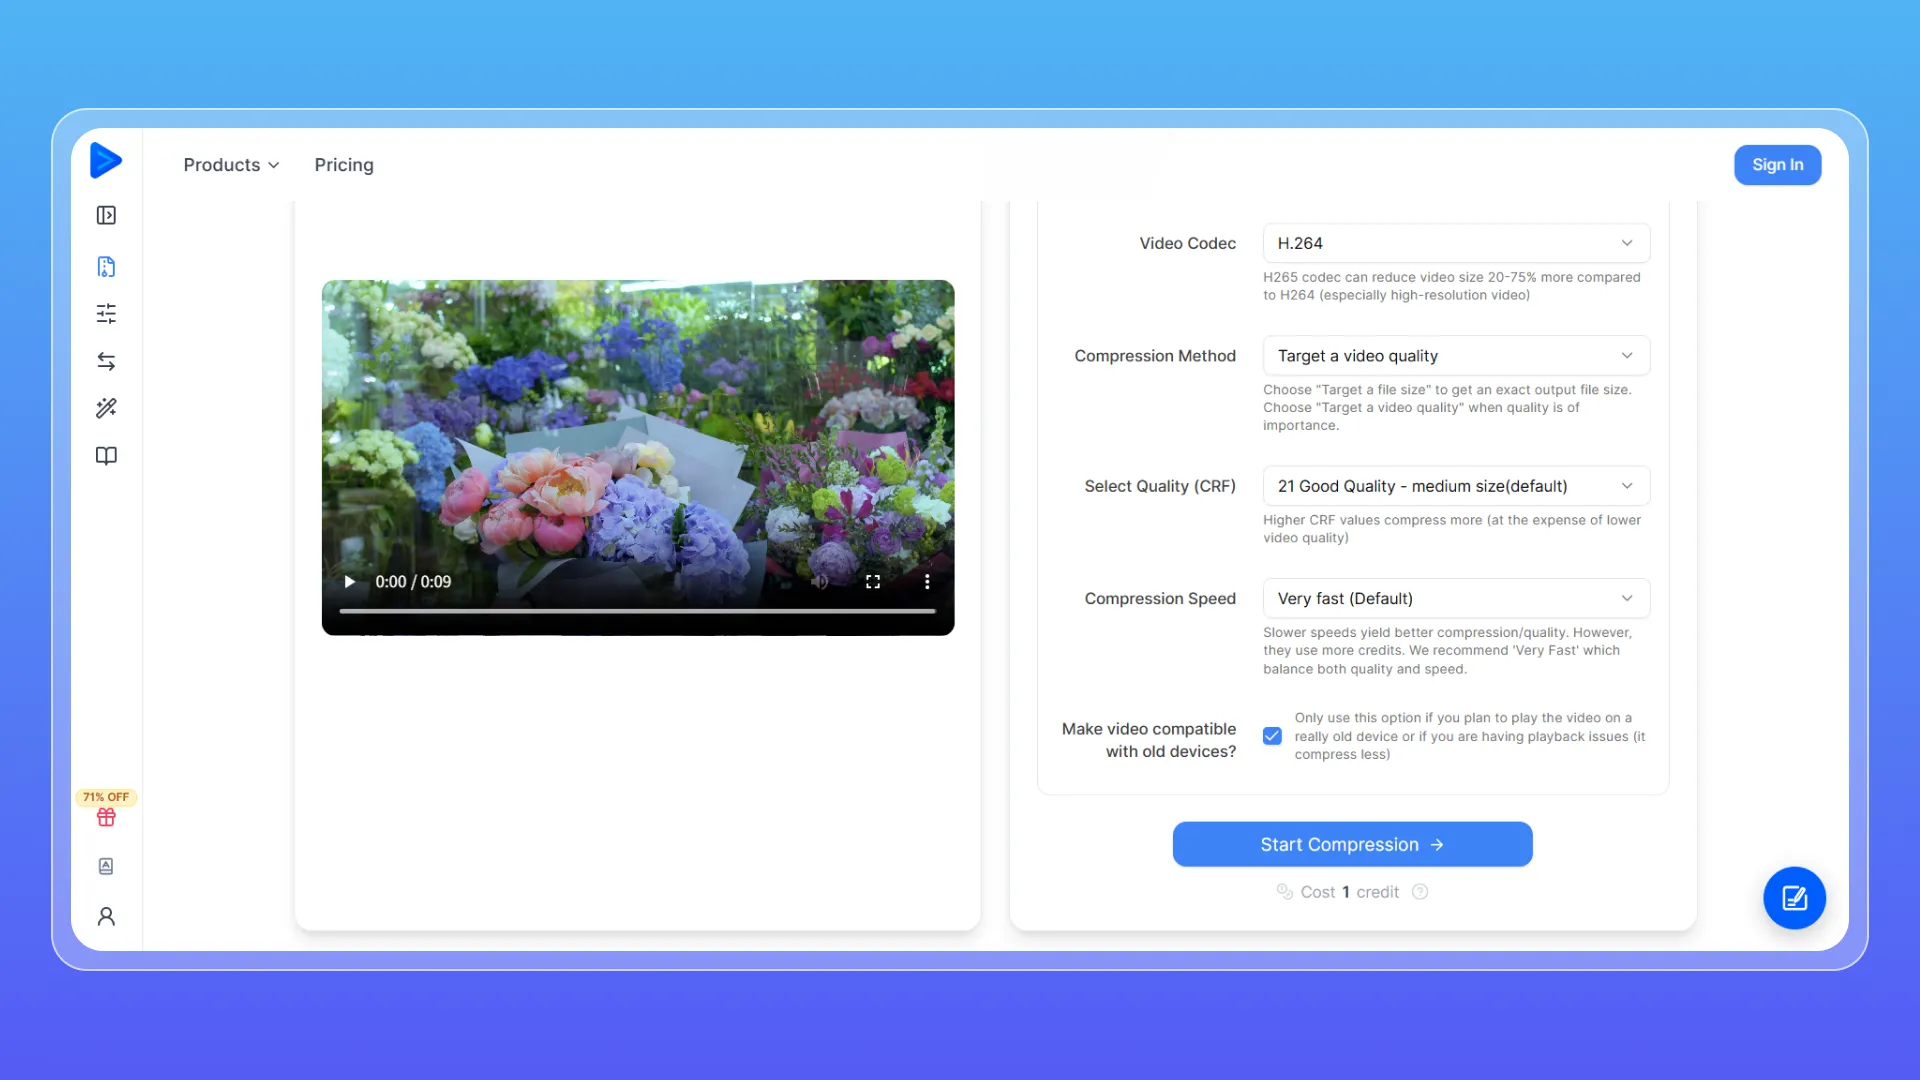
Advanced Compression also includes Compression Speed and compatibility with older devices. Faster settings finish sooner; slower encoding can spend more processing time searching for efficient compression.
Enable older-device compatibility only when you actually need it.
Method 3: Trim Unnecessary Footage First
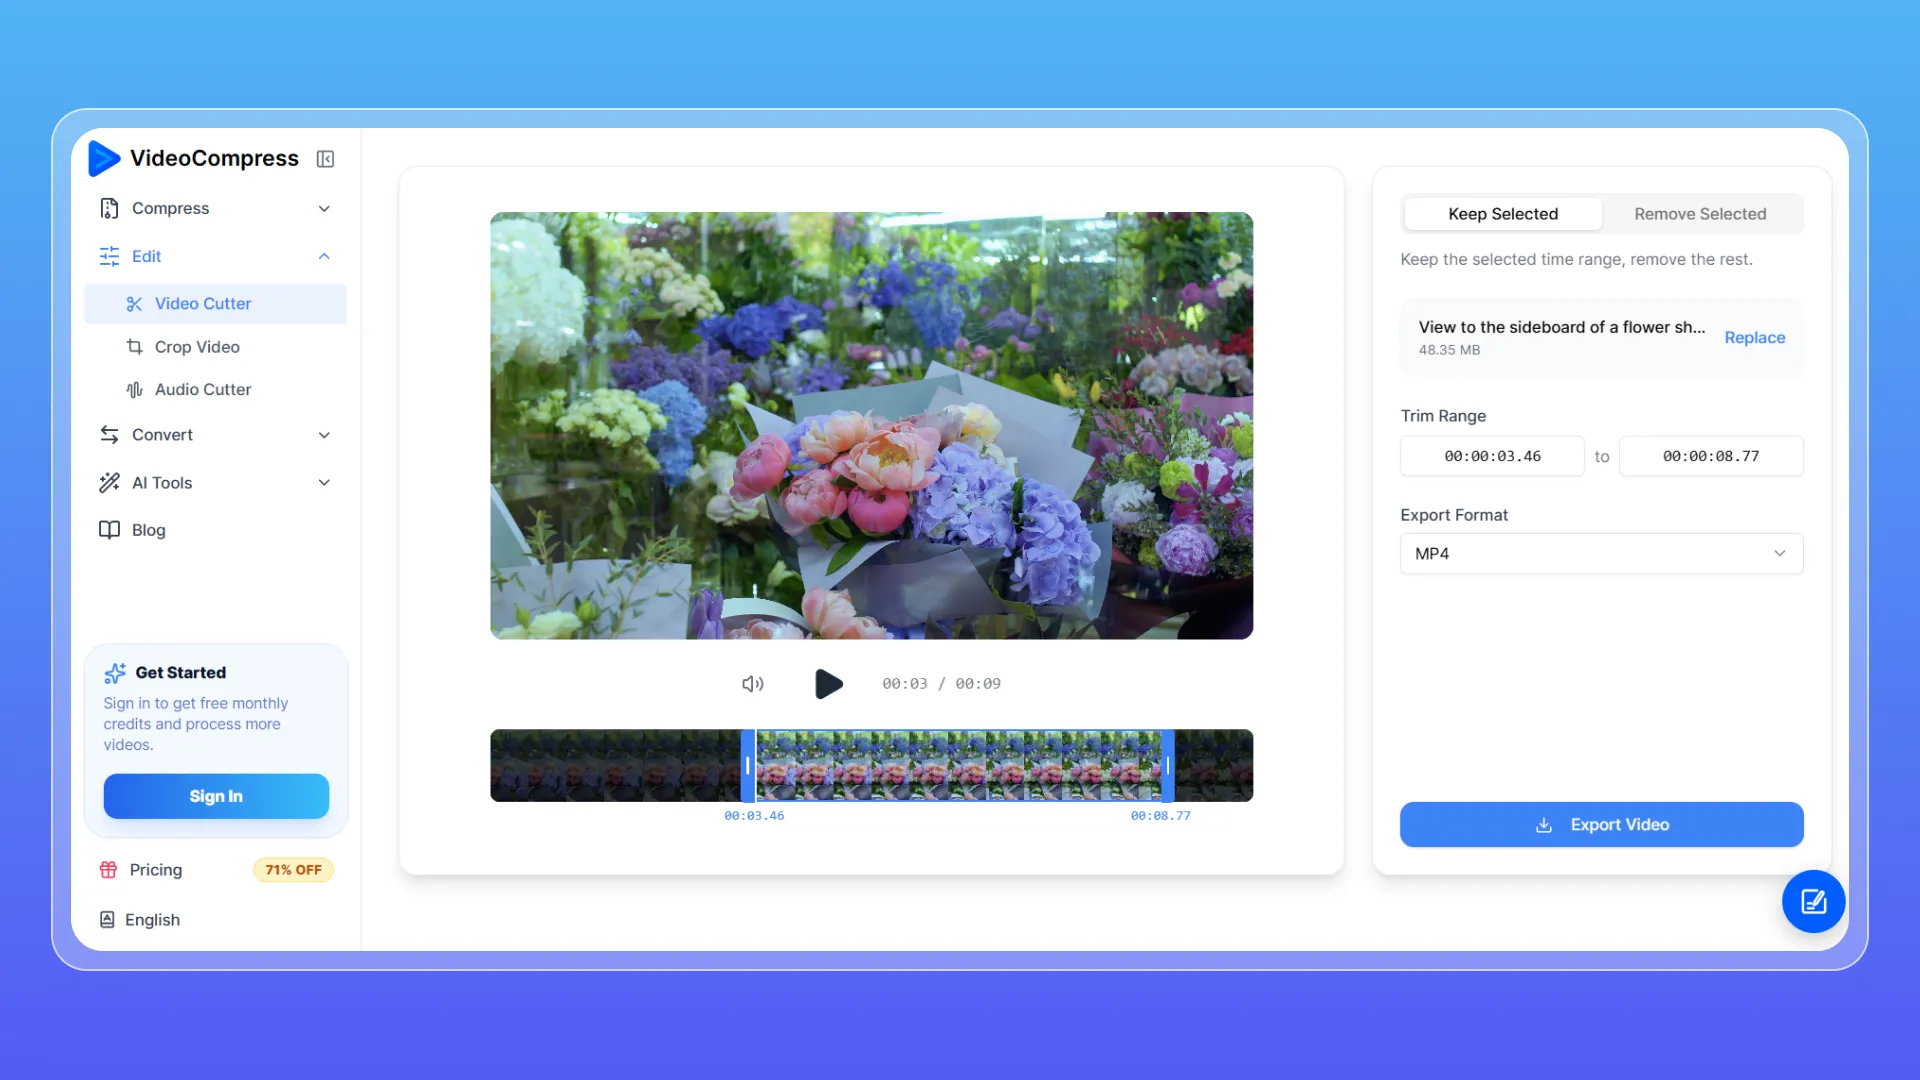
Sometimes the cleanest way to make a file smaller is to delete the parts nobody needs.
Think about a screen recording with 30 seconds of setup, a meeting with empty footage at the end, or a phone video that kept recording after the useful moment. Those seconds take space.
Use online video cutter to remove unnecessary sections, export the shorter clip, and then send it to the video compressor if it is still too large.
The workflow is simple:
Cut first → compress second.
This is especially useful for meetings, webinars, interviews, tutorials, screen recordings, and social clips. Unlike aggressive quality reduction, trimming does not make the footage you keep blurrier.
If you often prepare video for sharing, cutting first means there is less footage to encode.
Method 4: Crop Black Bars or Unused Areas
VideoCompress Video Cropper can remove black bars or unwanted areas. If the cropped video is exported at smaller dimensions, it may also help reduce the final file size.
A practical workflow is:
Crop unwanted areas → choose an appropriate resolution → compress.
The final size still depends on resolution, bitrate, codec, quality, and video length.
How to Reduce MP4 File Size on iPhone or Android
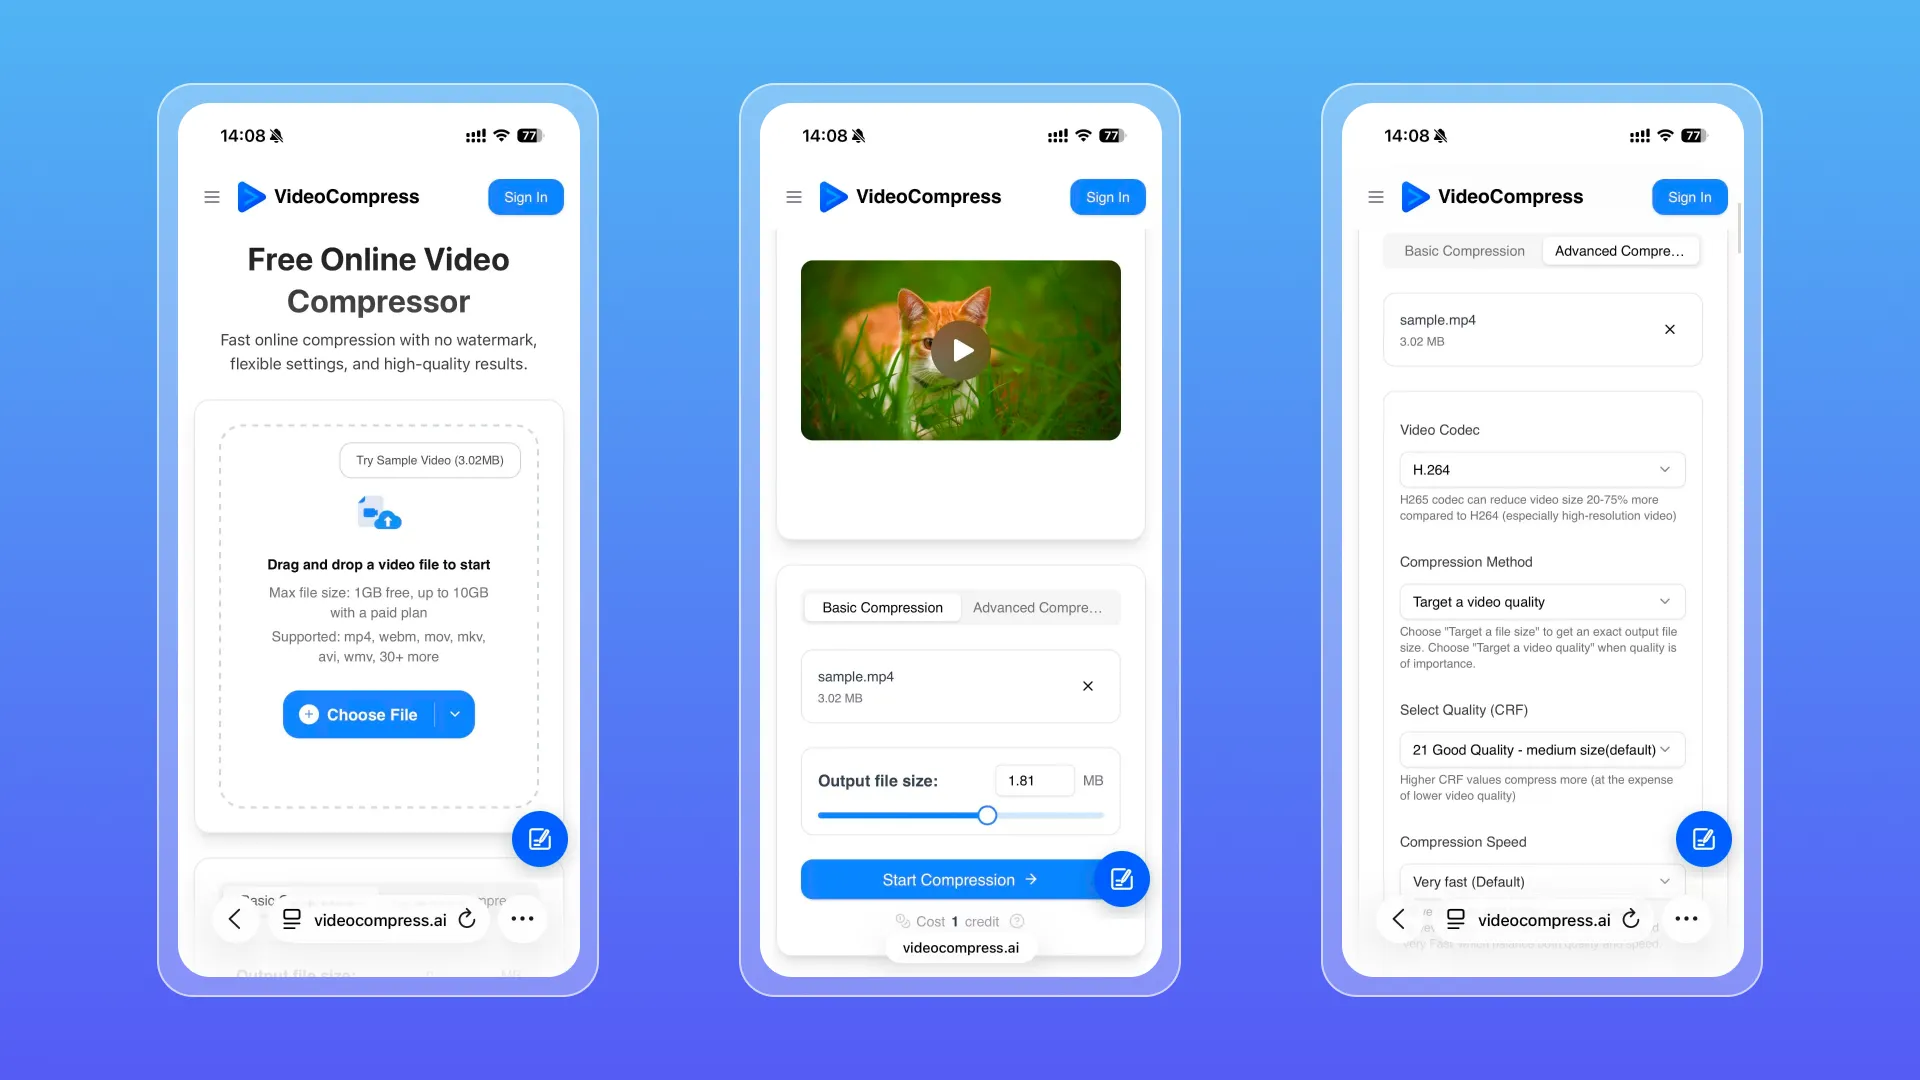
Apple’s current iPhone guidance notes that faster frame rates and higher resolutions result in larger videos. Depending on the device, iPhones can record HD or 4K video at a range of frame rates, so high-quality phone footage can become large surprisingly quickly.
You do not need to move the file to a computer first. To use VideoCompress as a mobile MP4 compressor:
- Open VideoCompress in Safari, Chrome, or another mobile browser.
- Choose the MP4 from your phone.
- Pick Basic Compression for a target size or Advanced Compression for more control.
- Start compression and save the smaller file.
Because VideoCompress runs in the browser, you can reduce video size directly on your phone without moving the file to a computer or installing another app. It works well for email, uploads, and quick sharing.
Which Method Should You Choose?
| Your goal | Best option |
|---|---|
| Get under a specific MB limit | Basic Compression |
| Balance file size and quality | Advanced Compression |
| Improve compression efficiency | H.265/HEVC |
| Reduce an unnecessarily high resolution | Lower output resolution |
| Remove unwanted scenes | Video Cutter |
| Remove black bars or unused edges | Video Cropper |
| Compress on iPhone or Android | VideoCompress in your browser |
If you are not sure, start with Basic Compression. A video compressor should make the common case easy. Move into Advanced Compression when you need more control over codec, quality, resolution, speed, or compatibility.
Tips to Reduce MP4 Size Without Obvious Quality Loss
Do not compress more than necessary.
If the upload limit is 100 MB, there is little benefit in forcing the file to 15 MB unless you have another reason.
Keep the original.
Use the smaller copy for delivery and sharing, but keep the master if the footage matters.
Match resolution to the destination.
4K is useful for editing and large displays; it is not mandatory for every email, web player, or mobile clip.
Cut or trim before you compress video.
Removing unwanted footage reduces data without softening the footage you keep.
Inspect difficult scenes.
Fast motion, screen text, subtitles, gradients, fine hair, and low-light footage tend to show compression artifacts first.
Use quality mode when size is flexible.
If appearance matters more than an exact MB number, let the video compressor prioritize quality.
FAQ
Can I reduce MP4 file size without losing quality?
You can often make an MP4 much smaller without noticeable loss in normal viewing, especially if the source has unnecessarily high resolution, uses a less efficient codec, or contains footage you can remove. Extremely aggressive lossy compression will eventually affect quality.
What is the easiest way to make an MP4 smaller?
Use an online video compressor with a target output size. VideoCompress Basic Compression lets you choose the final size directly instead of calculating bitrate settings yourself.
Does lowering resolution reduce MP4 file size?
Usually, yes. Lower resolution means fewer pixels per frame, so there is less image data to encode. The exact reduction still depends on codec, bitrate, quality, frame rate, and duration.
Is H.265 smaller than H.264?
It can be. Apple states that HEVC/H.265 can create files up to 40% smaller than H.264 at the same visual quality in its Compressor workflow. H.264 is still useful when compatibility is the priority.
What CRF should I use?
There is no single perfect CRF for every video. Start with the default in your video compressor, inspect the result, then adjust gradually. If the file is still too large, increase compression; if details look soft or blocky, move back toward higher quality.
Can trimming or cropping reduce video size?
Yes, in different ways. Trimming shortens the video and directly removes data. Cropping removes unused parts of the frame and can help when paired with an appropriate output resolution.
Can I compress MP4 on my phone?
Yes. VideoCompress works in a browser, so you can upload, process, and save an MP4 on iPhone or Android without desktop software.
Final Thoughts
If you know the size you need, use VideoCompress Basic Compression and set a target. If quality matters more, open Advanced Compression and fine-tune codec, CRF, resolution, speed, and compatibility. If the video contains content or frame areas you do not need, use Video Cutter or Video Cropper first.
The best video compressor is not the one that produces the smallest file at any cost. It is the one that gets your MP4 small enough for its destination while keeping the video looking the way you want it to.